Test one visible zone before expanding
Lay out one run within the product's length and pressure limits. Keep it visible while checking for leaks and uneven wetting. The printable record separates outlet flow from soil moisture so a dry far end does not automatically become a longer schedule.
Which one saves more water?
Drip irrigation gives you more control over where water leaves the line, but neither method saves water automatically. A misplaced or clogged emitter can leave a plant dry. A soaker hose can work well in one straight bed, but its output can vary from one end of the hose to the other.
Do not choose from a blanket water-saving percentage. Lay out one zone, run it manually, and check the soil near the beginning, middle, and end. Fix dry spots, pooling, leaks, and overspray before adding a timer. The better system is the one you can test, maintain, and adjust for the plants and soil you actually have.
Do not copy someone else's run time
There is no useful universal answer to “How long should I run it?” A 50-foot soaker hose at one pressure can release a different amount from another hose with the same length. Drip run time changes with emitter flow, emitter spacing, row spacing, target water depth, soil, weather, and plant stage.
For inline drip, the product's flow rating and spacing can produce a defensible starting estimate. For a soaker hose, use a timed field test instead. The wet surface alone is not proof that water reached the root area.
Inline-drip starting-time calculator
Use the ratings printed on the dripline or product page. The calculation follows Utah State University Extension's inline-drip formula.
Boundary: this estimates inline drip at the manufacturer's recommended pressure. It does not calibrate a soaker hose, point-source emitters, a clogged line, a mixed-pressure zone, or the water your plants actually need. Confirm the result in the soil before setting a timer.
Two-layer diagnostic record
Is the outlet weak, or is water missing the roots?
Check outlet delivery and soil wetting separately. Equal drip rates can still leave dry gaps. The record below is a planning aid, not a field trial, pressure test or irrigation-design approval.
1. Compare like-for-like outlets
Use one visible zone. Record the exact model, permitted pressure and run length, filter requirement and emitter rating. For accessible point-source emitters with the same rating, collect water in separate marked containers for the same interval. Keep outlets at their normal height and out of the collected water.
A porous soaker has no interchangeable rated outlets. Observe equal lengths near the beginning, middle and end for dry patches, seepage or spraying; do not convert one pore's output into a hose flow rating. For inline dripline that cannot be collected without changing its route, use the manufacturer's checking method.
2. Check the soil between outlets
Record moisture before watering. After a consistent infiltration delay, check gently beside and between outlets at a root-relevant depth without cutting roots. Write down the depth and delay; neither is universal for seedlings, established crops and containers. Stop if water pools or runs out of the bed.
To print a blank record: use your browser's Print command. The print layout contains only the worksheet below, with writing space. No account is needed. Notes written on paper are not sent to this website.
One-zone watering check
Small Yard Starter · September 12, 2026
smallyardstarter.com/articles/drip-irrigation-vs-soaker-hose/#distribution-record
Planning worksheet, not a pressure test or universal watering schedule. Follow the exact product instructions. Stop for leaks, pooling or runoff.
Date / zone / run length:
Product / outlet rating / source:
Pressure checked as instructed / filter:
Collection minutes / recent rain:
Soil-check depth / delay after watering:
Beginning
- Outlet rating or soaker observation
- Collected mL / minutes, if applicable
- Soil before; beside / between after
Middle
- Outlet rating or soaker observation
- Collected mL / minutes, if applicable
- Soil before; beside / between after
End
- Outlet rating or soaker observation
- Collected mL / minutes, if applicable
- Soil before; beside / between after
One change / same test conditions / repeat result:
Decision: keep / repair / reposition / redesign / stop. Reason:
L/hour = collected mL × 60 ÷ minutes ÷ 1,000. Use only for a collected outlet, not a single soaker pore. Similar output does not prove the root zone is wet.
A filled example — assumed values, not a real test
Assume three accessible point-source emitters each rated 3 L/hour, checked at their instructed pressure. Each is collected for 5 minutes: beginning 250 mL, middle 250 mL, end 125 mL. These equal 3, 3 and 1.5 L/hour. The end delivers half as much in this example; that is a reason to investigate, not a universal pass/fail limit.
The record's next entry would be: “Inspect the end branch for a visible kink; turn off and depressurize before correcting it; repeat the same collection.” Soil findings stay “not checked” until observed. Even a later 250 mL result would not prove that gaps between plants are watered. Do not copy these assumed values as a schedule or claim they describe your system.
Use the pattern, then change one thing
- Similar output, dry soil gaps
- Check outlet placement and spacing against soil and roots. Reposition within the system's limits and retest before adding time.
- Weak output downstream
- Inspect visible kinks, leaks, filter condition, run length and elevation. Follow approved flushing instructions. Turn off and depressurize before servicing.
- Every outlet is weak
- Check the valve, filter, regulator and source. Use the upstream bucket-test record; do not assume a larger kit creates pressure.
- Output appears normal, but water pools
- Stop before runoff. A lower application rate or separate cycles may help; persistent saturation needs a drainage assessment.
Do not automate an unresolved fault. Repair or reposition first, then repeat under comparable conditions. Choose a timer only after distribution works.
Basis: University of Maryland water conservation, University of Minnesota watering guidance and Colorado State drip guidance. The worksheet and assumed example are our explanatory format, not an Extension experiment protocol.
Repairability is a real part of the choice
A soaker hose has fewer parts, which is useful when one short bed needs one simple loop. But output is difficult to tune at a single plant, and a damaged or uneven section may force you to replace more of the run.
Drip tubing adds fittings and inspection work, but an emitter can be moved, a punched hole can be closed with a goof plug, and a cut section can often be joined with the correct repair coupling. That makes drip more sensible when plants move, roots expand, or one outlet needs a different flow. Confirm that replacement emitters, plugs, and couplings match the tubing size before buying the kit.
Measure these six things before buying either system
1. Count each watering group
Write down every bed, row, and container group that needs water. Plants with different watering needs may need separate zones rather than one long run.
2. Measure the real route
Measure from the faucet to the farthest point, following corners, gates, and bed edges. Mark any walkway the hose or tubing would cross. A route that creates a trip hazard is a layout problem, not a reason to buy more fittings.
3. Test faucet flow with a bucket
Gallons per hour (GPH) = bucket gallons × 3,600 ÷ fill seconds. Gallons per minute (GPM) uses ×60 instead. For example, 1 gallon in 20 seconds = 180 GPH = 3 GPM. Convert source flow and the manufacturer's zone limits to the same unit before comparing them.
A bucket measures open-outlet flow, not pressure in PSI, and does not prove the flow available at a system's required operating pressure. Keep required backflow protection in place. Use the repeatable bucket-test steps, then follow the manufacturer's pressure and zone-design checks. Tubing capacity can limit a zone even when the source supplies more.
4. Check pressure, filtration, and backflow requirements
A drip setup commonly needs a filter and pressure regulator. Backflow protection may also be required. Check the product instructions and local water-provider or building requirements before assembling the faucet connection.
5. Mark roots and plant spacing
Drip emitters must sit where water can reach the root area. A soaker hose needs a route that wets the bed evenly enough for its plants. Check the soil at several points after the first run instead of judging coverage from the wet surface alone.
6. Plan maintenance and winter storage
Decide where the timer, filter, regulator, removable fittings, and drained hose will go at the end of the season. If that work will not happen, choose the simpler setup now.
When a soaker hose makes sense
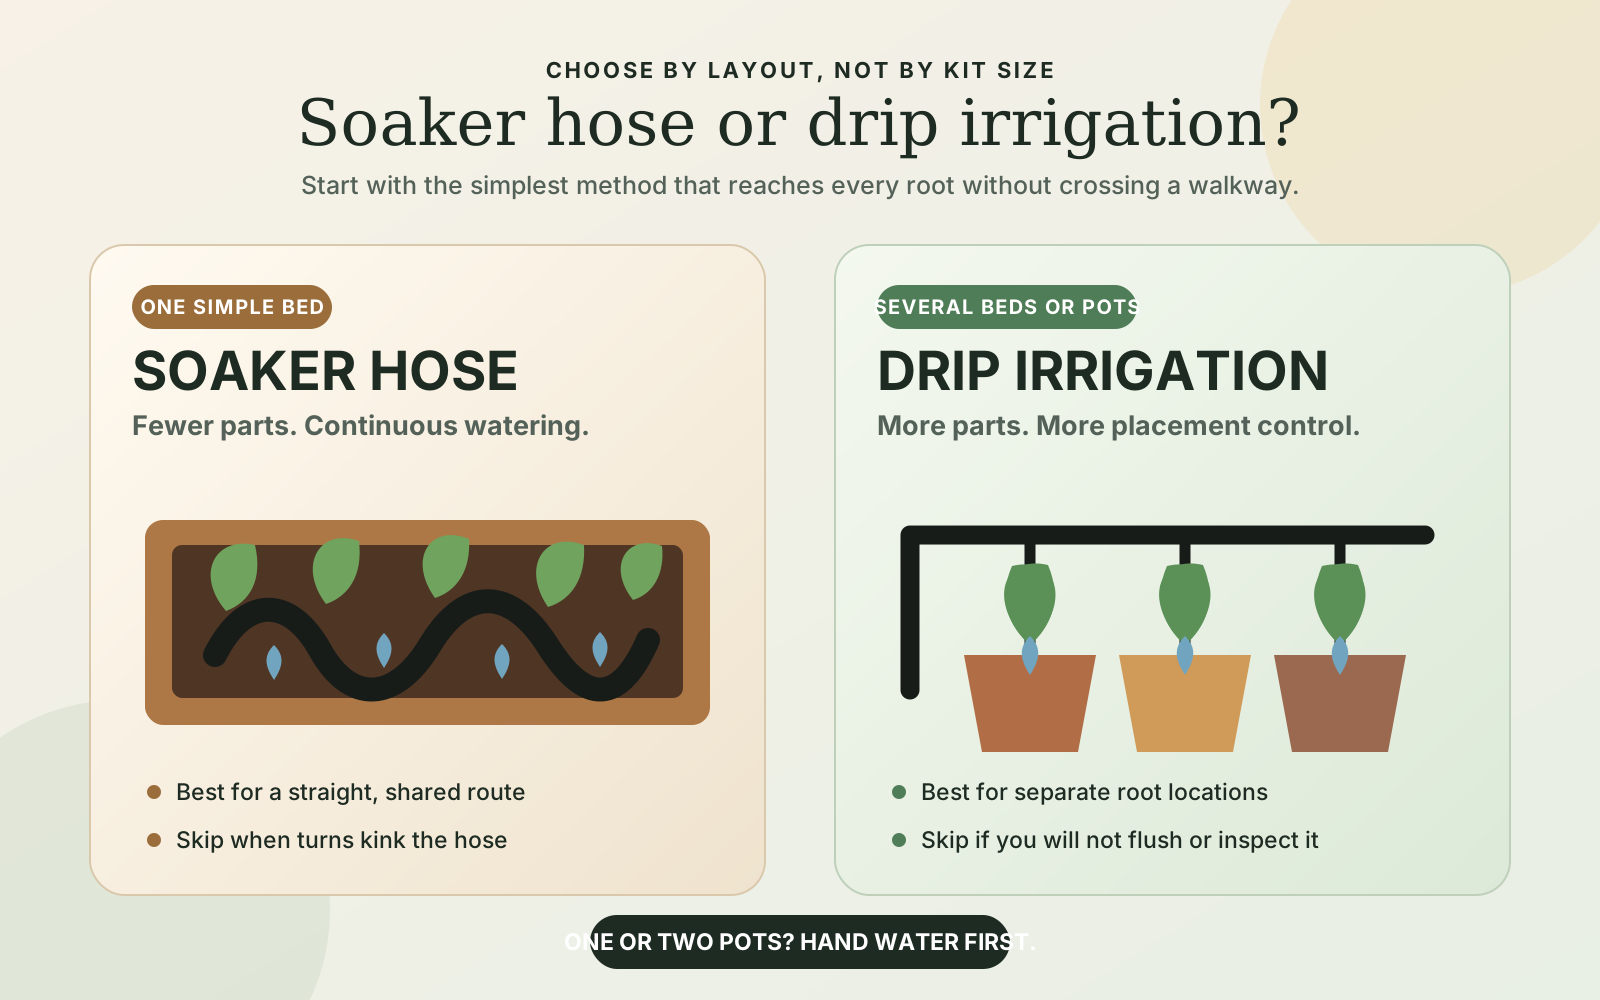
A soaker hose fits one small bed with a mostly straight, level route. It has fewer connections than a drip kit and can be laid out quickly. Secure it near the root zone, keep it out of the walking path, and check moisture at the beginning, middle, and end of the run.
The tradeoff is precision. A soaker hose does not place a measured emitter beside each plant, and output can vary along its length. Colorado State University Extension recommends keeping soaker-hose runs short for uniform delivery; that matters in small beds where the far end may be the whole crop row.
Tight turns can kink the hose, and slope can make one end wetter than the other. Keep the route short and simple rather than buying extra length for future plans.
Skip it when: the hose must cross a walkway, the bed has several sharp corners, the bed is noticeably sloped, or nearby containers need different watering amounts.
Compare: Soaker hoses for one simple bedCompare on Amazon
Affiliate link. As an Amazon Associate I earn from qualifying purchases.
When drip irrigation earns its extra parts
Drip irrigation fits several beds, rows, or containers when water needs to arrive at chosen points. Mainline tubing can serve a zone while emitters or emitter tubing handle plant spacing. A timer may help after the route and run time have been tested manually.
The extra control comes with extra checks. Use the filter and pressure regulator specified for the components. Place emitters over the root area, inspect them during the season, flush lines after repairs, and secure exposed tubing so it does not become a trip hazard.
Drip is especially useful when the planting changes within the same area: tomatoes on one side, shallow greens on another, and containers along the edge. It is less useful when the whole garden changes weekly and every emitter would need to be moved before the next watering.
Skip it when: the garden layout changes every week, the faucet assembly has no protected location, or checking the system would take longer than watering the small area by hand.
Compare: Drip irrigation starter kitsCompare on Amazon
Check the faucet parts separately from the tubing
A kit description may emphasize tubing length and emitter count while giving little detail about the faucet connection. Confirm whether the package includes the filter, pressure regulator, backflow device, adapters, and end-flush fittings your setup requires. Match every part to the manufacturer's pressure range and thread size.
Compare: Drip filters and pressure regulatorsCompare on Amazon
Do not assume a rain barrel can run the same parts
Gravity-fed water is a different source than a pressurized hose bib. A rain barrel may not have enough pressure for standard emitters, and roof runoff can carry grit that clogs small openings. If the water source is a barrel, choose parts explicitly rated for low pressure, add the filtration the manufacturer requires, and test one short run before connecting a whole bed.
For many small yards, the lower-risk answer is to use the barrel for filling a watering can and keep the drip or soaker setup on a faucet. That avoids turning a water-saving idea into a clogging and troubleshooting project.
Pots and absences
One timer does not make different pots one watering group
Group by when the pot needs water, then adjust delivery within that group. A lower-flow emitter changes the amount per run; it does not give that pot a separate start day. Keep pots needing different intervals on separate controllable zones or arrange hand watering.
The inline-drip calculator estimates an application depth over spaced lines. Do not use it to prescribe minutes for individual pots. Start with actual container observations and the outlet-delivery check.
Make the groups before buying the timer
- Label each pot. Record the plant, approximate container volume, material, mix and sun exposure. Match the label to a phone photo. A shared pot size alone does not establish a shared watering need.
- Observe a normal wet-to-dry cycle. Check the mix below the surface before watering, after watering and at the next check. Record the time and weather. Do not let plants wilt deliberately to discover a limit.
- Separate timing from quantity. Pots that become ready at similar times may share a zone. Test each outlet's placement and amount separately. Pots still wet when others need water should not receive an extra run merely because they share tubing.
- Retest after a change. Moving a pot, replacing mix, changing emitters or hotter weather can invalidate the record. Use a new observation, not the old schedule.
Same interval; different amounts
Compatible emitter rates or counts may let one zone serve both pots. Check the exact system limits and wetting pattern. Higher flow in one spot can drain past dry parts of the mix.
Different watering intervals
Use separate scheduling or keep the exception on a hand-watering list. Do not compensate for a less frequent need only by turning its emitter down.
Water exits; mix stays dry
Water can bypass dry mix. Inspect moisture away from the outlet, not only the drain hole. Stop and correct the wetting problem before accepting the timer setting.
Mix stays wet or saucers fill
Recheck drainage and the schedule. Do not add a routine extra run. A wilting plant is not automatically a dry plant.
Watch a scheduled start and a scheduled stop
First make the manual watering and distribution checks work. Then program a short, supervised cycle using the exact timer manual. Watch it start on its own; after the scheduled end, confirm flow stops at the outlets and connections do not leak. Pressing “water now” alone does not test the programmed schedule.
Check the clock, selected days, duration, battery indicator and any rain-delay or off setting. Repeat under the intended schedule while someone is home. A few successful cycles do not prove month-long reliability or performance in hotter weather.
If it fails to start, verify the water supply and settings before extending the run time. If it fails to stop, close the upstream faucet and follow the manual before reuse. Do not remove batteries mid-run as an improvised safety test. Do not assume every timer closes its valve when its batteries die.
Copy this watering handoff card
Fill one card per group or exception. Use it with a photo and a person who can check the pots. These fields stay in the page only: no upload, account or automatic saving. Copy your notes before leaving; this is not a remotely monitored watering service.
A decision example, not a plant prescription
Assume two sunny pots need another watering when a sheltered pot is still moist. One shared daily start with a smaller emitter on the sheltered pot does not establish that all three have the same interval. Keep it separate, or agree on a hand check. The actual intervals and minutes remain blank until observed.
For a long absence, agree on check-ins and an accessible shutoff. If departure is too close for supervised trials, use a dependable helper instead of expanding an untested kit. Smartphone control is not proof that water reached the roots or that a valve closed.
Basis: Maryland Extension on container monitoring and wetting; Minnesota Extension on moisture and changing container demand; Rain Bird's hose-end timer troubleshooting guide. The handoff card and supervised-start/stop sequence are our practical planning format, not a manufacturer certification.
Compare a timer only after the trial
Match independent schedules to your measured groups, not to the number of pots. Check faucet fit, battery access, manual start and stop, rain delay, and seasonal removal. Verify the exact model's failure behavior in its manual. Skip a timer if a short hand-watering round and a reliable helper solve the absence.
Compare: Simple hose timers with manual overrideCompare on Amazon
Hand watering is the right answer for some small gardens
Automation is not automatically an improvement. A watering can or ordinary hose is often enough for two containers beside the door or a bed that changes through the season. Start there when the route is short and you are usually home to water.
Add a system when the repeated task becomes the problem. Do not add tubing only because it looks like the more complete garden setup.
A low-risk setup order
- Mark the beds and containers that need water.
- Measure the faucet route and test source flow.
- Choose one method for one zone.
- Lay the hose or tubing above ground and check every connection.
- Run it manually, then check soil moisture at several points.
- Adjust the route or run time before adding another zone or timer.
- Follow the system instructions for flushing, draining, and winter storage.
What to compare on the product page
- Maximum route or zone length for the tubing diameter.
- Operating pressure and source-flow requirements.
- Included filter, regulator, backflow device, and faucet adapters.
- Emitter type, spacing, flow rating, and replacement availability.
- Flush fittings and instructions for cleaning clogged parts.
- Timer manual override, battery access, and weather protection.
- Seasonal drainage and storage instructions.
Do not buy a larger kit because the extra fittings appear to offer better value. Unused parts become clutter, and an overlong first zone is harder to diagnose.
Questions readers usually have
Is drip irrigation always better than a soaker hose?
No. Drip irrigation offers more placement control, but it also adds filtration, pressure management, emitters, and maintenance. A soaker hose is often the better fit for one simple bed.
Can I use either system for containers?
Drip emitters are easier to place across separate containers. A soaker hose can serve a tightly grouped row, but it becomes awkward when pots have different sizes or watering needs.
What if my water pressure is low?
Measure source flow first and check the operating range of every component. Colorado State University Extension notes that low-pressure components are available, but the zone still needs to stay within the source and manufacturer limits.
Can I use drip irrigation on a slope?
Slow application can reduce runoff, but elevation changes affect pressure. Check the product guidance and consider pressure-compensating emitters where the layout calls for them.
What should I do before winter?
Disconnect and store the removable faucet assembly, then flush and drain the lines as the system instructions require. Do not assume that every elbow or low point will empty on its own.
Source and limits
Colorado State University Extension's Drip Irrigation for Home Gardens supports the guidance on source-flow checks, filters, pressure regulation, emitter placement, inspection, flushing, trip hazards, and winter drainage. It also explains that soaker hoses do not meter water as precisely as emitter devices.
Colorado State University Extension's vegetable-garden irrigation guidance supports the short-run, level-ground caution for soaker hoses and the need to manage low pressure rather than stretching one long line across a changing bed.
Utah State University Extension's peer-reviewed vegetable watering guide provides the inline-drip application formula, example emitter rates and spacing, and the warning that run time still varies with soil, temperature, plant size, and growth stage.
EPA WaterSense's microirrigation guidance supports using microirrigation for targeted watering and treating design, installation, and maintenance as part of system efficiency.
EPA WaterSense's home-maintenance guidance supports checking drip lines for clogs and leaks, watching for overwatering or underwatering, adjusting schedules for seasonal conditions, and draining irrigation lines before freezing weather.
Community discussions at Permies, Gardening Stack Exchange, Houzz, and Gardening Forums were used to identify the recurring questions about low pressure, dry line ends, unknown run time, and repairs. Those posts are anecdotes, not performance proof. The Extension and EPA sources establish the technical boundaries.
These sources do not prove that a particular product will fit your faucet, meet local backflow rules, or work with your water pressure. Check the current product instructions and local requirements before installation.
Keep planning the same small-yard system
- Start with the broad small backyard plan if watering is only one part of the layout.
- Reduce repeated yard chores before buying another automated tool.
- Choose hose storage by the real route if the hose is the main obstruction.
- Check a rain barrel site before buying if you want to collect roof runoff.